What is AWS Lightsail?
Lightsail is beginner friendly cloud hosting solution with server, storage, database and networking all in single to use package. Its preconfigured OS + Apps allows fast deployment of applications in affordable pricing. To demonstrate how easy it is to setup, configure instance, read the setup below
For the demonstration, I am using very simple Architecture for AWS LightSail as below and will create a WordPress on LAMP setup (WordPress works really well on LAMP ????)
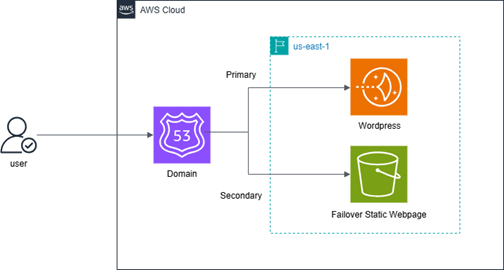
Figure 1: LightSail webapp with S3 Website failover
Step 1: Lets spin the Lightsail instance
Log in to your AWS account and search for AWS Lightsail > chose instance > create instance
- Instance location -> Your preferred location (say us-east-1)
- Platform-> linux
- App+OS -> WordPress
- SSH Key -> create and download
- Network->Dual Stack
- Select a size -> You may go ahead and choose based on your need but for this demo, lets create small $5 which comes with 512 MB RAM, 2vCPU, 20GB SSD and which is good enough for our purpose, plus its 90 days free ????
- Give instance your name and click create instance
Step 2: Setup the network
- If everything works well in above steps , your OS and WordPress should be up and running. You can check this by copying Public IP address allocated to you and pasting on web browser (prefer http not the https, as the site is not yet secured) and you should get homepage of WordPress.
- However, just like EC2 instance, public IP of Lightsail may get lost once you reboot your instance. Since we are going to bind IP to route 53, you need a static ip address. Go to Network tab – IPV4 network, attach static IP -> create one and attach
- Another thing to do is to disable IPV6 networking at this time. This is because when we install certificate at a later stage, the setup works well for IPv4, but with IPV6 may cause error during certificate installation
Step 3: Lets Connect
- There are many ways to connect to your instance either using terminal or SSH client
- I prefer going ahead with own SSH client here on Visual studio code terminal, you can use any another terminal of your choice
- Run the command below from where you have stored the ssh key(in .pem format)
ssh – i “yourkey.pem” bitnami@yourstaticipaddress.
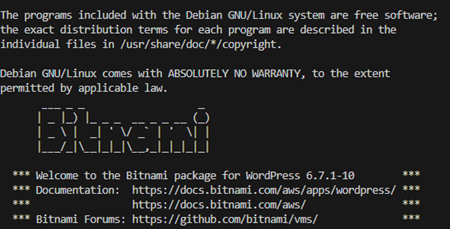
- Once you login you should see below image
- Retrieve the WordPress website password -> ensure you are on /home/bitnami by running command “pwd”
- Run ls -la and you can find file bitnami_application_password
- Run “cat bitnami_application_password” -> note the password
- Go back to browser type http://yourstaticipaddress/wp-admin . This should open your WordPress login page. Where username is “user” and password which you just retrieved.
Step 4: Bind the IP to domain
- Next, lets create an “A” record on your DNS server. For this demo, lets use Route 53. (if you have domain registered from another provider make changes in that portal)
- On AWS console goto Route 53 -> DNS Management -> Hosted Zone
- Create 2 A records for yourdomain and www.yourdomain with the static ip address provided
- Let’s leave the routing policy as simple routing, we will change this later.
- Wait for some time as it takes some minutes to update all the DNS server.
- You can check on www.dnschecker.org if your domain is correctly configured.
Step 5: install SSL
- Comeback to terminal and run sudo /opt/bitnami/bncert-tool
- You need to provide domain name provide domain name in commas as yourdomain,www.yourdomain
- Enable HTTP to HTTPS redirection -> Y
- Enable non www to www redirection ->Y
- Enable www to non www redirection -> N
- Have a look at the changes which will about to happen press Y
- Provide email address
- Agree on the terms and conditions
- After installation check the “lock” icon on the browser as you open your webpage
Step 6: Configure Static website on S3 (Optional)
- Although its best to have a your instance behind a Load balancer, but incase if you don’t have a need but you want users to route to static website when your instance is not available S3 bucket comes handy.
- You can refer to this link to setup a static website on S3 https://docs.aws.amazon.com/AmazonS3/latest/userguide/HostingWebsiteOnS3Setup.html
- Final step, Go to Route 53 edit your exist A change routing to policy “Failover”, -> Primary
- Create another A record, routing policy to “Failover” -> Failover